如何修改rainmeter氣象面板資訊及來源
- 如果您對本文有不理解之處,請先閱讀Rainmeter的使用教學: Rainmeter 繁體中文教學(mp3播放,台灣城市氣象,相框面板整合及範例下載 ...
- 採用accu-weather.com的面板在此下載,另外本文完全是我的修改心得,完全未參考任何文件,所以如果有所誤差或不正確,請多包涵。
採用Rainmeter來顯示氣象面板,用來接收氣象資訊的來源網站為weather.com,不過前幾天颱風過境的時候,weather.com接收到的xml氣象資料,偶而會漏掉一些訊息,導致rainmeter的面板無法顯示。
另外,比較另一個氣象資訊來源accu-weather.com。同時以台南地區測試,weather.com顯示的溫度似乎偏高。下圖左方為accu-weather.com的氣象資訊,右方為weather.com的氣象資訊。 
我有點懷疑weather.com顯示的是否參考到高雄的氣象資訊,查看它的xml data,在-cc (current conditions目前環境)的<obst>一節,看到有Kao-hsiung的字樣,讓人更加懷疑。 
此外,weather.com必須註冊才可使用,雖然可以將soap改為xml就不用註冊,不過好像不是正規作法?
因為以上三個原因,我決定改用rainmeter建議的accu-weather.com的氣象資訊。也許accu-weather.com的accu是accurate的縮寫,可能它的訊息要比weather.com更準確。
修改方法
先編輯ini檔案(編輯方法請參考 Rainmeter 繁體中文教學(mp3播放,台灣城市氣象,相框面板整合及範例下載 ... ) ,以下語法中如果是「;」開頭的,都是註解。
(1)更改URL的來源網址
找到以下文字:
URL=http://xml.weather.com/weather/local/TWXX0020?cc=*&unit=m&dayf=6
改為
URL=http://rainmeter.accu-weather.com/widget/rainmeter/weather-data.asp?Location=ASI|TW|TW018|TAINAN&metric=1
ASI|TW|TW018|TAINAN是台南的城市編碼,您可以到http://www.rainmeter.net/locate_code/ 來找尋你所在城市的代碼。
metric=1,表示溫度單位採用攝氏。
(2)更改RegExp
找到以下文字
RegExp="(?siU)<weather ver="(.*)">(.*)<lsup>(.*)</lsup>(.*)<tmp>(.*)</tmp>(.*)<t>(.*)</t>(.*)<icon>(.*)</icon>(.*)<day d="1" t="(.*)" dt="(.*)">(.*)<hi>(.*)</hi>(.*)<low>(.*)</low>(.*)<icon>(.*)</icon>(.*)<t>(.*)</t>(.*)<day d="2" t="(.*)" dt="(.*)">(.*)<hi>(.*)</hi>(.*)<low>(.*)</low>(.*)<icon>(.*)</icon>(.*)<t>(.*)</t>(.*)<day d="3" t="(.*)" dt="(.*)">(.*)<hi>(.*)</hi>(.*)<low>(.*)</low>(.*)<icon>(.*)</icon>(.*)<t>(.*)</t>(.*)"
改為
RegExp="(?siU)<local>.*<city>(.*)</city>.*<currentconditions>.*<temperature>(.*)</temperature>.*<humidity>(.*)</humidity>.*<weathertext>(.*)</weathertext>.*<weathericon>(.*)</weathericon>.*<windspeed>(.*)</windspeed>.*<winddirection>(.*)</winddirection>.*<forecast>.*<day number="2">.*<daycode>(.*)</daycode>.*<weathericon>(.*)</weathericon>.*<hightemperature>(.*)</hightemperature>.*<lowtemperature>(.*)</lowtemperature>.*<day number="3">.*<daycode>(.*)</daycode>.*<weathericon>(.*)</weathericon>.*<hightemperature>(.*)</hightemperature>.*<lowtemperature>(.*)</lowtemperature>.*<day number="4">.*<daycode>(.*)</daycode>.*<weathericon>(.*)</weathericon>.*<hightemperature>(.*)</hightemperature>.*<lowtemperature>(.*)</lowtemperature>.*"
以上說明如下:
在瀏覽器的網址列,打上:
http://rainmeter.accu-weather.com/widget/rainmeter/weather-data.asp?Location=ASI|TW|TW018|TAINAN&metric=1
就會傳回xml data 如下:
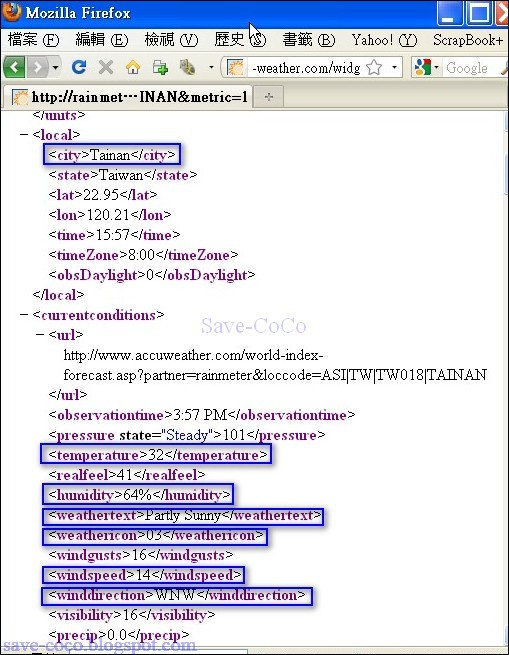
以上的xml data的資訊必須和
RegExp="(?siU)<local>.*<city>(.*)</city>.*<currentconditions>.*<temperature>(.*)</temperature>.*<humidity>(.*)</humidity>.*<weathertext>(.*)</weathertext>.*<weathericon>(.*)</weathericon>.*........
逐一對映,連先後次序都要一致才行。
「RegExp=....」這段文字語法會剖析從氣象來源擷取到的xml data,每一個(.*)代表一種氣象資料。例如<city>(.*)</city>會傳回城市名稱,<temperature>(.*)</temperature>會傳回目前溫度。其中每個氣象資料以.*作分隔。
因此由上而下,會傳回以下資料(請特別注意前面的項目的數字代號,後面會用到):
01:city=>城市名(Tainan)
02:temperature=>目前溫度(32)
03:humidity=>溼度(64%)
04:weathertext=>天空狀況文字描述(Partly Sunny-局部陽光)
05:weathericon=>天空狀況對映的圖示代碼(03)
06:windspeed=>風速(14)
07:winddirection=>風向(WNW-西北西)
08:daycode=>第一個預報的日期(Sunday)
09:weathericon=>天空狀況對映的圖示代碼(03)
10:hightemperature=>高溫
11:lowtemperature=>低溫
12:daycode=>第二個預報的日期(Monday)
13:weathericon=>天空狀況對映的圖示代碼
14:hightemperature=>高溫
15:lowtemperature=>低溫
16:datecode=>第三個預報的日期(Tuesday)
17:weathericon=>天空狀況對映的圖示代碼
18:hightemperature=>高溫
19:lowtemperature=>低溫
(3)調整項目代號
因為在weather.com中的項目代號,與accu-weather.com完全不同,所以必須逐一修改。例如在weather.com的目前氣溫,是在第五項<tmp>(.*)</tmp>,而在accu-weather.com卻變成第二項<temperature>(.*)</temperature>。因此在ini檔內, 每個StringIndex=5都要改成StringIndex=2 。
(4)改變表示天空狀況的圖示檔名
weather.com與accu-weatther.com傳回的圖示代號完全不同,所以也要逐一修改。
例如:
假設上面天空狀況對映的圖示代碼(weathericon),傳回( 03 )的值;而天空狀況文字描述(weathertext),傳回的是( Partly Sunny )。那麼 03.png 這個圖檔,必須是能代表 Partly Sunny 的圖示,如果您覺得圖示與Partly Sunny不一致的話,就必須找到合適的圖檔,並將檔名改為03.png。(png圖檔位於rainmeter安裝目錄\skins\面板名稱的目錄下,或我的文件夾\rainmeter\skins\面板名稱的目錄下) 
以上介紹的是從weather.com轉到accu-weather.com的過程,我已經改好的面板在此下載。
以下再介紹如何增加或調整氣象資訊。
增加或調整氣象資訊
如何加一個項目到RegExp中
假設我們要插入一個realfeel(實際感受溫度)的項目,那您知道該怎麼做嗎?
參考上圖的xml data,realfeel是在temperature之後,所以應該如以下改法。
RegExp="(?siU)<local>.*<city>(.*)</city>.*<currentconditions>.*<temperature>(.*)</temperature> .*<realfeel>(.*)</realfeel>.*<humidity>(.*)</humidity>.*<weathertext>(.*)</weathertext>.*<weathericon>(.*)</weathericon>.*<windspeed>(.*)</windspeed>.*<winddirection>(.*)</winddirection>.*<forecast>.*<day number="2">.*<daycode>(.*)</daycode>.*<weathericon>(.*)</weathericon>.*<hightemperature>(.*)</hightemperature>.*<lowtemperature>(.*)</lowtemperature>.*<day number="3">.*<daycode>(.*)</daycode>.*<weathericon>(.*)</weathericon>.*<hightemperature>(.*)</hightemperature>.*<lowtemperature>(.*)</lowtemperature>.*<day number="4">.*<daycode>(.*)</daycode>.*<weathericon>(.*)</weathericon>.*<hightemperature>(.*)</hightemperature>.*<lowtemperature>(.*)</lowtemperature>.*"
而更改之後的項目代號變動如下:
01:city=>城市名(Tainan)
02:temperature=>目前溫度(32)
03:realfell
以下所有的項目代號,都要加1
04:humidity=>溼度(64%)
05:weathertext=>天空狀況文字描述(Partly Sunny-局部陽光)
06:weathericon=>天空狀況對映的圖示代碼(03)
......
如何把天氣資訊的英文變中文
找到以下文字:
[MeasureWeatherDesc]
Measure=Plugin
Plugin=Plugins\WebParser.dll
Url=[MeasureWeatherRSS]
Substitute="Light":"小","Heavy":"大","Strong":"暴","Isolated":"局部","Mostly":"大部","Partly":"局部","Scattered":"零星","and":"夾","Fair":"轉晴","Cloudy":"多雲","Clear":"晴","Cloudy":"多雲","Clouds And Sun":"晴間多雲","Wind":"有風","Drifting":"飄","Drizzle":"微雨", "Dust":"浮塵","Rain":"雨","Sunny":"晴朗","Fog":"霧","Haze":"輕霧","Hail":"冰雹","Rain":"雨","Snow":"雪","Storm":"雷雨", "Mist":"薄霧","Lightening":"雷電","Thunder":"雷","Shower":"陣雨","大部 晴朗":"晴間多雲","雨 陣雨":"陣雨","雪 陣雨":"陣雪","有風y":"有風","T-雷雨":"雷雨"
StringIndex=4
說明如下:
- MeasureWeatherDesc是自定義文字,但下面的顯示區段會參考到此一部分。
- 將xml data傳回的英文描述,改成中文,格式如下:Substitute= "Partly Sunny":"局部陽光","....."
- 因為天空狀況的文字描述項目在第四項,所以StringIndex=4,如果您有插入別的項目,導致這個代號更改,那StringIndex就要跟著改。
01:city=>城市名(Tainan)
02:temperature=>目前溫度(32)
03:humidity=>溼度(64%)
04:weathertext=>天空狀況文字描述(Partly Sunny)
05:weathericon=>天空狀況對映的圖示代碼(03)
06:windspeed=>風速(14)
07:winddirection=>風向(WNW-西北西)
08:daycode=>第一個預報的日期(Sunday)
如何調整您要放置氣象資料的位置,字型,大小....
假設您要改變上面「天空狀況文字描述」的顯示樣式,您必須找到MeasureName是MeasureWeatherDesc的顯示樣式區段,再依需要修改。
[MeterDesc]
MeasureName= MeasureWeatherDesc
;MeasureWeatherDesc 是在上一段定義的(上面紫色文字)。
Meter=STRING
X=203 ;文字顯示的x,y座標
Y=13
FontColor=#myFontColor# ;文字顏色
StringStyle=BOLD
FontSize=14
StringAlign=RIGHT;以x,y座標為基準點,往右或往左顯示。
StringStyle=BOLD
;FontFace=Arial
FontFace=#Font#
Antialias=1
其他語法說明
語法一
StringIndex=2
;StringIndex=2會傳回目前溫度
IfAboveValue=-100
IfAboveAction=!execute [!RainmeterHideMeter MeterIconNA][!RainmeterShowMeter MeterIcon]
以上語法,我不是很確定,只知道他大概是說,如果項目代號2(StringIndex=2)傳回的值如果超過-100(IfAboveValue=-100),就會執行某一個動作([!RainmeterShowMeter MeterIcon])
。
整段的用意是用來判斷如果溫度超過-100度,就會正常顯示天氣的圖示,否則就是抓不到氣象資料,就顯示預設無資料的圖示(因為這是從weather.com的格式改來的,它原來有ver這個項目可判斷,但accu-weather.com沒有,拿掉這一段又會出錯,只好借用temperature這個項目來判斷)。
語法二
[MeasureWeatherTempKl0]
Measure=Plugin
Plugin=Plugins\WebParser.dll
Url=[MeasureWeatherRSS]
StringIndex=2
IfBelowValue=2
IfBelowAction=!execute #HideNormal# [!RainmeterShowMeter MeterTempDBlau.txt] [!RainmeterRedraw]
[MeasureWeatherTemp0]
Measure=Plugin
Plugin=Plugins\WebParser.dll
Url=[MeasureWeatherRSS]
StringIndex=2
IfAboveValue=1
IfAboveAction=!execute #HideNormal# [!RainmeterShowMeter MeterTempBlau.txt] [!RainmeterRedraw]
[MeasureWeatherTemp15]
Measure=Plugin
Plugin=Plugins\WebParser.dll
Url=[MeasureWeatherRSS]
StringIndex=2
IfAboveValue=15
IfAboveAction=!execute #HideNormal# [!RainmeterShowMeter MeterTempWeiss.txt] [!RainmeterRedraw]
[MeasureWeatherTemp27]
Measure=Plugin
Plugin=Plugins\WebParser.dll
Url=[MeasureWeatherRSS]
StringIndex=2
IfAboveValue=27
IfAboveAction=!execute #HideNormal# [!RainmeterShowMeter MeterTempRot.txt] [!RainmeterRedraw]
以上語法,會在溫度為2度以下,2度(含2度)以上,15度以上,27度以上,分別用不同的顏色來顯示溫度,以區別炎熱或涼爽或寒冷。
如何增加並顯示一個氣象項目
- 在RegExp加入一個項目。(方法請參考上文的「如何加一個項目到RegExp中」一節)
- 定義一個描述該項目的區段,範例如下:
[MeasureWeatherWindDirection]
Measure=Plugin
Plugin=Plugins\WebParser.dll
Url=[MeasureWeatherRSS]
Substitute="N":"北","W":"西","S":"南","E":"東","NW":"西北","NE":"東北","SW":"西南","SE":"東南","NNW":"北偏西","NNE":"北偏東","SSW":"南偏西","SSE":"南偏東","ENE":"東偏北","WSW":"西偏南","WNW":"西偏北","ESE":"東偏南","北西":"西北","北東":"東北","南西":"西南","南東":"東南","北西北":"北偏西","北東北":"北偏東","南西南":"南偏西","南東南":"南偏東","東東北":"東偏北","東東南":"東偏南","西西南":"西偏南","西西北":"西偏北","VAR":"多變"
StringIndex=7 - 定義一個顯示該項目的區段,範例如下:
[MeterWindDirection]
MeasureName=MeasureWeatherWindDirection
Meter=STRING
X=10
Y=130
FontColor=#myFontColor#
FontSize=11
StringAlign=LEFT
StringStyle=BOLD
FontFace=#Font#
Antialias=1
Postfix="風" ;這個項目會緊接在傳回的文字之後,如「西偏南」變成「西偏南風」
如何增加一個純文字項目
範例如下:
[MeterWind1.txt]
Meter=String
X=75
Y=130
FontColor=#myFontColor#
FontSize=10
StringAlign=LEFT
StringStyle=BOLD
FontFace=#Font#
AntiAlias=1
Text=風速:
